Saturday, December 27, 2008

Just for spare parts

The results of the tach experiment are in. And the winner is.....the engine computer (not me).

Hooking up the pulse generator with 5V amplitude waves to the ECM did not drive the tach. I checked at a few frequencies simulating 1000, 2000, and 4000 RPM. No go. I also checked the RPM's with the OBD scanner. This confirmed the computer was on and also confirmed zero from the RPM input.

There may be another input to the ECM that is needed (may be from the camshaft sensor). Although it would have been nice to use the OEM tach at this point it is just easier to replace the tach and speedo with aftermarket replacements.

Oh well. No big deal. Into the spare parts closet for the pulse generator. Never know when I might need one again!

Friday, December 19, 2008

Just for the hell of it

I'm still waiting for the 2/0 wire to arrive. It should be here before Christmas. In the mean time I'm still fooling around with the tach.

As I mentioned before I'd like to keep the stock tach if possible. Worse case scenario I replace it. Not a big deal, but not as fun either.

Speaking of fun, in order to simulate the new motor spinning and the new RPM sensor I decided to build a pulse generator. This pulse generator creates square wave pulses of different frequencies. These square wave pulses basically duplicate the output of the RPM sensor. By feeding pulses of a known frequency I can see if the engine control module(ECM) will properly drive the tach.

Now I could have easily purchased a pulse generator, but what fun would that be. Any excuse to sit by the fireplace on a cold day, look productive, and use a soldering iron shouldn't be passed up.

This is a picture of the circuit while I was playing with it.


Here it is mounted on a board. I'm showing you the nice side of the board. My soldering is not pretty!


And here is a picture of the oscilloscope tracing showing the square waves produced by the pulse generator. As an aside Ebay is your friend(...oscilloscope...$4 ebay :-))


Next step is to attach the generator to the ECM. The ECM expects a voltage of 5V. This only puts out 1V so I'll need to hook it up to a small amplifier for testing. Maybe I'll build the amp too! Oh wait, I already built one a few years ago for my son's guitar ....just for the hell of it :-)

Friday, December 12, 2008

Just the ECM

That's the engine control module. Since there is no engine it would make sense that no ECM is needed. Not the case since the tachometer and speedometer inputs run through the ECM. So I guess I'll hook it back up.

The ECM is connected to the vehicle by two connectors each with over 60 individual wires. The top connector has the cable attached. The bottom does not.


Most of the 100+ wires that go to the ECM are for engine functions no longer needed. Out of all the wires I only need 8 (power, ground, ignition signal, CANH, CANL, vehicle speed sensor, crankshaft position sensor, and OBD communication).

With factory manual in hand I went through the bundle of wires and separated out the ones needed. The rest I bundled up, cut, and bagged. Eventually I'll cut off the wires not needed since they are bulky and get in the way.

Next I connected my OBD scanner and turned on the ignition. And as luck would have it the scanner started communicating with the ECM.

So now that I know the ECM works the next step is to hook up a new RPM sensor and see if the ECM accepts the input.

One last thing. Here is a picture of the instrument cluster partially installed. The signal lights are on top. The lower lights are dash illumination that get covers put on later. The lights seem to work fine although I need a couple more bulbs.

Wednesday, December 10, 2008

Just lots of acronyms

To everyone following this blog (all two of you, you know who you are) I apologize for not posting for a while. I'm sure you have been waiting with bated breath and were in the midst of going into withdrawal :-)

I haven't been posting, but that doesn't mean work has not been progressing. Currently I'm waiting for some wire to arrive. It is on back order.

In the mean time I've been working on the instrument cluster. Until I started taking the instrument cluster apart I didn't realize how few of the original cluster lights and gauges I could get rid of. Here is a picture of the original cluster.


The obvious gauge I wouldn't need was the fuel level. Some people actually do keep it and use it to track battery state of charge. I have another gauge for this so out it goes. Same with the engine temperature; no engine to temperature :-)

There are a bunch of lights indicating various engine conditions: too hot, change oil, service, battery, low coolant, etc. These would be sacrificed.

In the end there are only a few things I wanted to retain: tachometer, speedometer, odometer, turn signals, high beam indicator, and night time cluster illumination. In addition I will be adding a new gauge that lets me monitor battery voltage, battery amps, amps used, amps remaining, and a few other things.

This is the exploded view of the cluster.


In the old days each light and gauge in the instrument panel (I/P) would have dedicated wires. Vehicle speed sensor (VSS) to speedometer, crank position sensor (CKP) to tachometer, etc. Now a days cars have several computers collecting and dispensing information. Two of these are the engine control module (ECM) and body control module (BCM). They talk to each other and the sensors via a controlled area network bus (CAN Bus).

So the VSS sends its signal to the ECM. The ECM converts the analog VSS signal to a digital signal and broadcasts the information over the CAN. The BCM hears the VSS signal broadcast on the CAN and retransmits it to the I/P. The I/P then has a chipset that signals the speedometer needle to move.

They say that going from the analog way to the digital way saves 30meters of wire and decreases the car weight by dozens of pounds. It also makes "hacking" into the car electronics a hell of a lot harder. Oh for the pre-acronym days :-)

So here's the I/P circuit board. The four big white things are the four gauges. The bulbs are for the turn signals and I/P illumination. The little, rectangular white spots are LED's for all the warning lights.


Now I need room to fit the new gauge that keeps track of the batteries and motor. It has two parts, a display and a dial to select different display functions. Here is the display portion. The selector dial is a little smaller.


I decided that the best place to place the display was where the old temperature gauge was located. There were a few LED's there that I would not need. So after cutting out the unnecessary circuits and mounting the display I have this:


Next I had to do the same thing for the selector dial. The old fuel gauge on the far left was a good place. I also soldered a few wires to some LED"s to use as indicator/warning lights for the controller. This is the rear of the board after everything was mounted.


Here's what the front looks like.


On the left is the selector dial stem. On the right is the new display. I painted over the old markings where the thermometer was located. I need to paint over the old fuel gauge markings.

Next step is to get the I/P working again. I installed the I/P back into the dash and powered it up. The turn signals work (they are the only thing on the I/P that is directly wired and does not go through the CAN). The I/P illumination also works.

As expected most of the LEDS no longer work since I cut through the portion of the board that contained their circuitry. As for the speedometer and tach testing them will be a little tougher. I need to reconnect the ECM since the VSS provides data to the speedometer via the ECM.

The tach is a little tougher. Since I removed the engine I no longer have a crankshaft or a crankshaft sensor to provide data for the tach. I do have a sensor that will provide the new motor RPM's. I plan on connecting the new sensor to the ECM in place of the old sensor. Hopefully the new signal should satisfy the ECM. If not then I'll just pull the old tach and get an old fashioned analog one as a replacement.

Friday, November 28, 2008

Just fishing

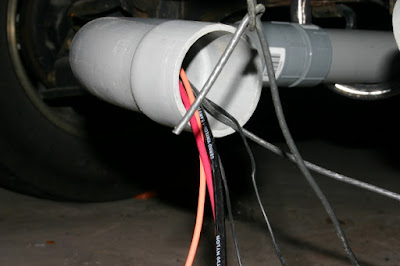
Fishing in this case refers to routing wires from the front of the vehicle to the back. Since the charger and the majority of the batteries are in the back of the car there needs to be a way to connect the components in the engine bay to the components in the rear.

To accomplish this I constructed a conduit made of PVC pipe. The conduit is fastened underneath the vehicle in the approximate position of the old exhaust system. Through the conduit multiple wires will be routed.

I've pulled through most of the smaller wiring. The next step is to pull through the "big wires".


The picture above is where the exhaust pipe ended in the back. I'll connect this to one other piece (seen from inside the vehicle below) in order to get the wires into the battery box.

Tuesday, November 18, 2008

Just spaghetti

Spaghetti:
1. pasta in the form of long strings
2. the electrical wiring in a car!


This past weekend I mounted most of the major electrical components and started wiring some of the high voltage components together. I'll post pictures and comments on that another time.

Tonight I started working on the low voltage (12V) wiring. One of the first things I did was re-attach the factory fuse box and make sure it was working.


I was very happy when the lights, wipers, and such worked properly :-)

Next was to create a new fuse box for the low voltage components I was adding. This required hooking the old fuse box to the new power supply. That part was easy. The harder part is "tapping" into the factory circuits. For instance some of the new equipment needs to turn on when the ignition is in the RUN position. Some need a signal from the START position. And some need a constant power supply regardless of the ignition position.

For the START position I decided to use the wire that went to the old starter. I had labeled the wire when I disconnected it. Additionally I have the factory manuals and the wiring diagrams.


So I went ahead and hooked up the volt meter to the starter wiring and put the ignition in the START position. The meter read zero volts. So I checked the connections and tried again. Still no voltage on the wiring. Finally I consulted the manual above. What it diagrammed and what I had forgotten is that clutch needed to be depressed to close the circuit. So I try again with the clutch down and bingo! The volt meter lights up.

Next I needed to find a wire that only turns on when the ignition is in the RUN position. I had about 50 wires that used to go to the engine and engine computer that I no longer needed. One of these should work. Initially I looked in the manual for the circuits turned on by RUN. Eventually I decided it was easier just to use the volt meter and check a few wires.

The good news is that there were several wires that fit the description. The bad news is that all the wires are signal wires and not large enough to supply the 40amps needed for the circuits. That means I'll have to go out tomorrow and get a relay for this set of circuits.

Here's a picture of the fuse box at this point. At the top of the picture you can see one of the mini fuse blocks that will distribute power to the low voltage components. (Don't worry Chris. I plan to neaten it up).


This is a diagram of the circuit blocks to be connected.

Thursday, November 13, 2008

Just $0.35 vs $200.00

The title of this post refers to the cost difference between fixing vs replacing a part. A little background first.

While disassembling the car I had to detach the shifter cables from the transmission. These cables connect the "stick shift" inside the car to the transmission. The cables translate the motion of moving the shifter to actual gear shifting.

In the process of removing the cables from the attachment to the transmission I ended up snapping the plastic bushings that connect the cables to the transmission. Here is a picture of the snapped bushing.


There is another part to this bushing that is not shown. It is a hollow half sphere made of metal that sits in the center of the bushing and snaps onto the transmission shifter.

Here's the bushing attached to the transmission. You can see the bottom arrow points to where the bushing is still attached. The top arrow points to where the bushing has been removed (and the little ball it snaps onto).


The cable fits over the bushing. You can see the eyelet where the bushing would go through.


So when this happened it was no big deal. The cables were undamaged. The transmission shifter was undamaged. All I needed to do was go to the dealership and get the replacement bushings. How much could they cost? :-(

The answer to that question is $0. You know why? They don't sell them separately. You see, Saturn has decided that if these break you have to buy the entire set of cables. Then remove the old set and install the new set! And how much are these cables? Over $200 (and that's the cheaper aftermarket price).

So now I have a dilemma. Do I spend $200 for something that can't cost more than $0.50? And if I don't how do I fix this?

Well my first inclination was to check the internet groups that discuss the Saturn Vue. I can't be the first person this happened to. Sure enough I was not. Apparently these bushing break frequently under normal use. Unfortunately no one had a good answer for fixing them. The best solution I could find was to cut off the metal ends where the cables attach, drill a hole and tap it. Then I could insert a bolt to hold the cables in place. Not the solution I was looking for.

My second thought was to find another manufacturer, application, or device that used the same type of bushing. Then I could modify it to work for me. Again no luck. These bushings seem to be unique.

The next idea was to find another Saturn Vue in a salvage yard and "harvest" the parts I needed. And that was where I was headed until I decided to create my own bushing.

So I ended up buying stiff polypropylene tubing the same diameter of the bushing. I then cut off a piece the same length as the bushing.


Next I drilled several holes in the tubing to insert cotter pins. The plan was to trap the neck of the shifter (below the ball) between the cotter pins. Total cost...about $0.35.

Here's the result.


Running through the gears the shifter works fine. The ultimate test will be how it holds up. Luckily with an electric motor shifting is at a minimum. Only time will tell.

Wednesday, November 12, 2008

Just a quick post

Now that the racks are completed I've started laying out the components. Here is a picture from the top.


The grey box on the right is the low voltage fuse box. The small green box next to it is the Hairball (the brains of the controller). Under the two is a large grey box holding the high voltage fuses.

On the bottom right is a black box. This is the car's original fuse box. The big green box with the dinosaur on it is the Zilla. The Zilla is the high voltage part of the controller. The silver/blue boxt next to it is the DC converter for supplying power to the 12V circuits. Not shown is the vacuum pump (for the brakes), the water pump (cooling the controller), and the hot water heater (passenger compartment heat).

Sunday, November 2, 2008

Just another update

When last we spoke or at least when last I spoke...actually when last I wrote...scratch that. When last I typed!

When last I typed I had just finished laying out the front battery racks. That was last weekend. This weekend I finished installing the racks.

Here are pictures of the top rack. It will hold four batteries.


Since my welding skills are non-existent the racks are bolted into place. First holes were drilled into the chassis and rivnuts fastened to the chassis. This basically makes the hole threaded in order to receive the bolt. The racks were then bolted into place with 3/8" grade 8 bolts. The cross members were secured with 1/4" bolts to the supporting members.

Since the chassis is not a flat and level in the engine bay some shimming of the racks was required in order to keep the racks level. One inch nuts and fender washers made great shims.


The lower rack was attached by 6" bolts through the frame. No rivnuts were needed since the bolts protruded through the chassis.


Per the last post I was planning on putting nine batteries in front. The two racks above hold seven total. The last two were going to sit in a rack between these two and close to the level of the lower rack. Unfortunately I'm about 3/4" of an inch short in space. I could put one more there and then one more in the back. But I think I'll put two more in the back since I have plenty of room there and use the extra space for the auxiliary 12V battery and other components.

Saturday, October 25, 2008

Just layout

After taking all the measurement went to the local hardware store to pick up angle iron for the front battery racks. Though no piece is much bigger than three feet there was 21 feet of 1 1/4" x 1 1/4" x 1/4" angle iron.

A great thing about the hardware store is that they cut the angle iron to length and only charged me $5 for around twelve cuts. Considering it would take me an hour to cut that much it was well worth it.

Here's a picture of one of the racks laid out.


Ultimately they should look like this.

Sunday, October 19, 2008

Just installed

Saturday was installation day. Hoisted in the motor and transmission. Bolted both back to the frame. Reattached the drive axles, steering gear, control arms, and linkages. Bled out the air from the clutch.

After this was all done I hooked up the motor to the power supply and gave it a spin. Wheels and drive axles working well. Clutch engages and disengages properly.

Here is the motor installed.


Next step is fabricating front battery racks and component mounts.

Sunday, October 12, 2008

Just in time to mate

This weekend I made a lot of progress. The adapter for the motor/transmission arrived on Friday. That means I can start putting things back together.

Here's a picture of the adapter.


First part to go on is the ring. This attaches to the motor.


Next the adapter plate attaches to the motor ring. The adapter plate matches the profile of the transmission and will eventually attach to the transmission.


Next is the coupler and bushing. The bushing goes around the motor drive shaft. The coupler attaches to the bushing. Eventually the coupler will attach to the flywheel.


The flywheel is then attached to the coupler. The flywheel position had to be adjusted to within +/- 1/100th of an inch.


The clutch and clutch pressure plate are then attached. Since the original clutch had over 100,000 miles on it I went ahead and put in a new clutch, pressure plate, and slave cylinder for the clutch.


Now it's time to mate the transmission and the motor together. This part was a little tricky. There are seven bolt holes that need to be lined up. And the drive shaft for the transmission has to go in the splined clutch hole. And did I mention that the motor weighs about 150lb and the transmission about 100lb. So you just cant "pick em up" and "slide em together".


Here's what it looks like assembled.


The motor is supported by the transmission at one end. I needed to support it at the end not connected to the transmission.


This bracket besides supporting the motor has another very important function. It counteracts the torque produced by the motor. Without the bracket the engine would spin in place instead of the engine staying in place and spinning the transmission input drive shaft.

The final piece of the puzzle was remounting one of the output drive shafts. The vehicle is front wheel drive. The transmission has two output drive shafts. One goes to the left wheel and one to the right wheel. The one going to the right wheel is two pieces.

One of these pieces is called the intermediate drive shaft. It was originally mounted to the engine. Since the engine is no longer present I needed to fabricate a mounting point to attach the drive shaft.

Below is the drive shaft looking end on. You can see the motor on the right and the transmission all the way in the back.


Below is the mounting bracket. Not pretty but it should do the job.


Next up, reinstall the transmission and motor.